10/02/2013

Yet Another Post About Design Patterns

This post is about design patterns. Not like most of the posts available on the internet, it does not focus on the details of each pattern and how to implement it. This post gives just a brief introduction on each pattern, mostly Gang of Four (GoF)-Pattern. The main focus of this post is to show you real-world examples which explain in simple scenarios how to use a pattern. Compared to other posts about design pattern I would like to describe trade-offs and when certain patterns should be avoided instead of highlighting only the advantages. Usually, a pattern is chosen to solve a certain problem because the trade-offs of the pattern are not expected to be relevant in this specific problem statement.

All examples are hosted on GitHub and can be accessed via the following url:
https://github.com/tstune/designpattern.git

Structural Patterns


Adapter Pattern

Adapter pattern allows integrating other systems, components or libraries without spreading their implementation details across the whole system. The adapter pattern is one of the most important patterns in Service-Oriented Architectures which reduces maintenance effort when integrating external services.

Example on github

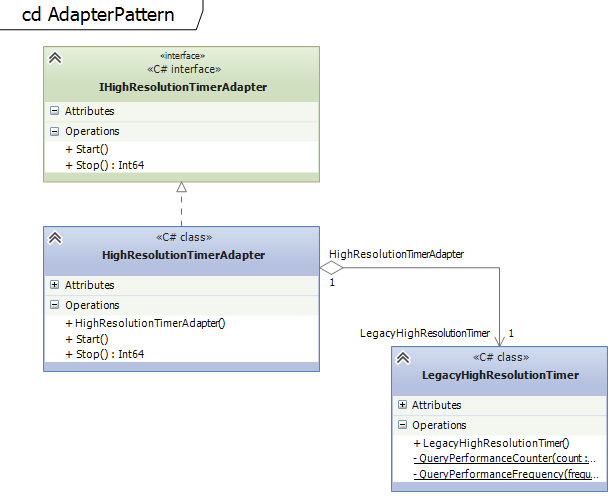
The example shows how the legacy high resolution timers of windows (LegacyHighResolutionTimer) can be integrated without working with them directly. Instead, the wrapper (IHighResolutionTimerAdapter) can be used internally. This gives the flexibility to replace the legacy timer implementation easily at any time. In this example the implementation could be replaced with a Linux-based solution, for instance, when the code has to run on another platform.

Trade-offs
The adapter pattern leads to additional boilerplate code (the adapter itself) which has to be maintained.

Proxy Pattern

The proxy pattern is similar to the adapter pattern but instead of adapting the interface of the class it just forwards the calls one-by-one and implements the same interface like the class it is wrapping.
Usually, the adapter pattern should be preferred because it gives the flexibility of how to design the interface for the consumers.

Example on github
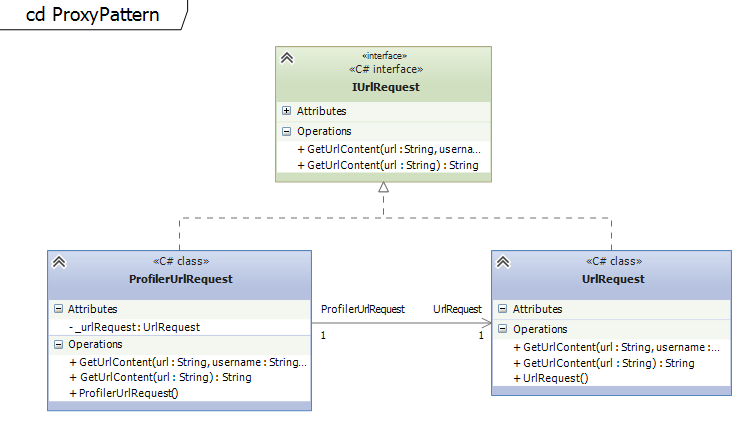
Classical example of how a profiler can be implemented as a proxy. The class ProfilerUrlRequest implements the same interface like the actual class UrlRequest and just forwards every single call to this class. Before and after the calls the profiling code can be placed.

Trade-offs
Like the adapter pattern the proxy pattern leads to boilerplate code which has to be maintained. This additional level of abstraction makes it also more difficult to find out which class provides the needed functionality.

Facade Pattern

The Facade pattern helps hiding the complexity of a system. It provides a simplified interface for the consumer. The implementation of the facade usually calls multiple classes and cumulates the output.
When designing a 4-layer application the second layer is usually implemented using the facade pattern. The top layer is the presentation layer, the third layer is the business / domain layer and the forth is the data access layer. The second layer acts as a facade to abstract the complexity of the business layer and simplifies access to it. The User interface needs in most of the cases access to multiple business classes to be able to render the view. In order to avoid too much code in the presentation layer the so called Application Service Layer (see Domain-Driven Design) can help abstracting the complexity.

Example on github
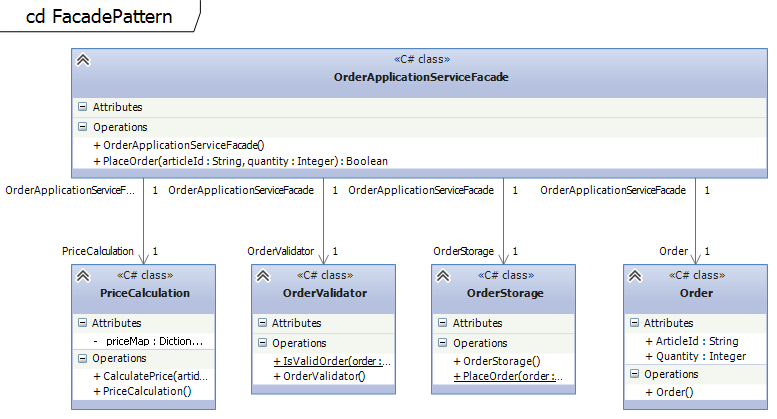
The OrderApplicationServiceFacade implements a method to place an order which has to do multiple steps like validating the input, calculating the price and finally placing the order. This involves multiple business objects like Order and Pricing.

Trade-offs
The advantage of the facade pattern to simplify the interface for the consumer can turn out to be a limitation in the system. If administrative users need to have access to special features the interface of the facade can be not sufficient and lead to many simple forwarding methods which are difficult to maintain.

Decorator Pattern

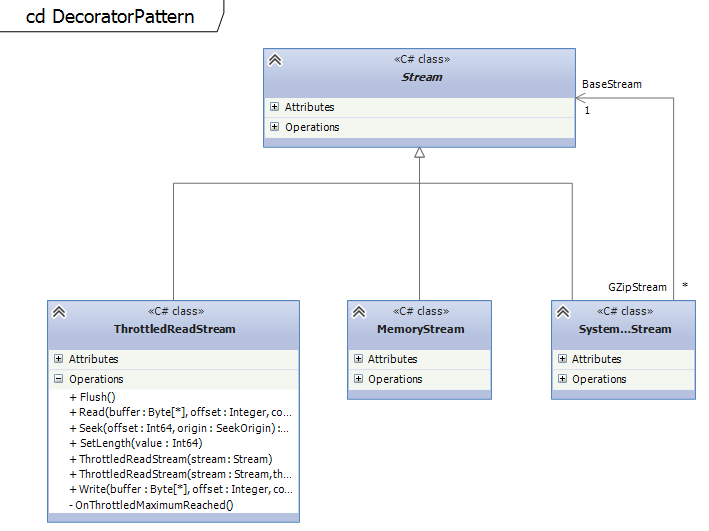
Every constructor takes an instance of the same abstract class. The implementation of streams in the .NET Framework is a good example for the decorator pattern. BufferedStream, MemoryStream, GZipStream take all the abstract Stream class in their constructors and allow to add additional functionality on top of other implementations.

Example on github

The example on github shows how to implement a concrete decorator for the Stream classes. The ThrottledReadStream class can be used to decorate existing streams and add additional functionality to throttle this stream. It is possible to throttle FileStreams, MemoryStreams or any other Stream.

Trade-offs
The decorator pattern can lead to many similar objects which can be hard to maintain.
For the developer it can be difficult to understand how to use the different objects and how to combine them.

Bridge Pattern

The Bridge Pattern allows to abstract sub-classes by forwarding certain parts of the implementation.

Example on github

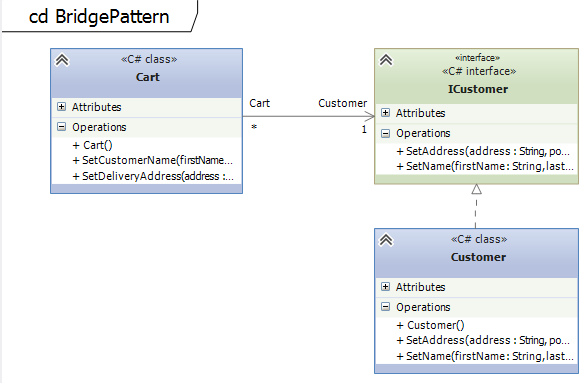
The class Cart is an aggregate and contains an instance of the Customer class. The Cart forwards certain method calls to Customer class which does the actual work. The Cart acts a bridge.

Trade-offs
Similar drawbacks like the Adapter pattern.

Creational Patterns


Factory Method Pattern

The factory method pattern makes it possible to decide at runtime which implementation to take. This can be based on configuration settings or just dynamically. It creates an instance of a class which fulfills a certain interface. The client will just work with the interface and does not have to know which implementation is used.

Example on github

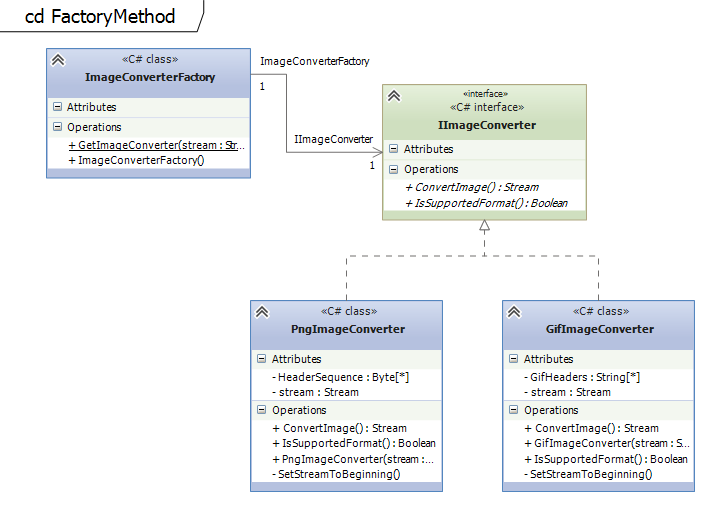
There are two examples on github. The first example shows how to implement a configurable Factory Method which decides based on configuration settings which implementation to take. In the second example (see UML diagram) the ImageConverterFactory chooses the right Image Converter (PngImageConverter, GifImageConverter) based on the header data of the byte stream.

Trade-offs
All the classes being used by the Factory Method have to follow the exact same interface.
Compared to the abstract factory the client is bound to the Factory and the Factory Method cannot be exchanged easily.

Abstract Factory Pattern

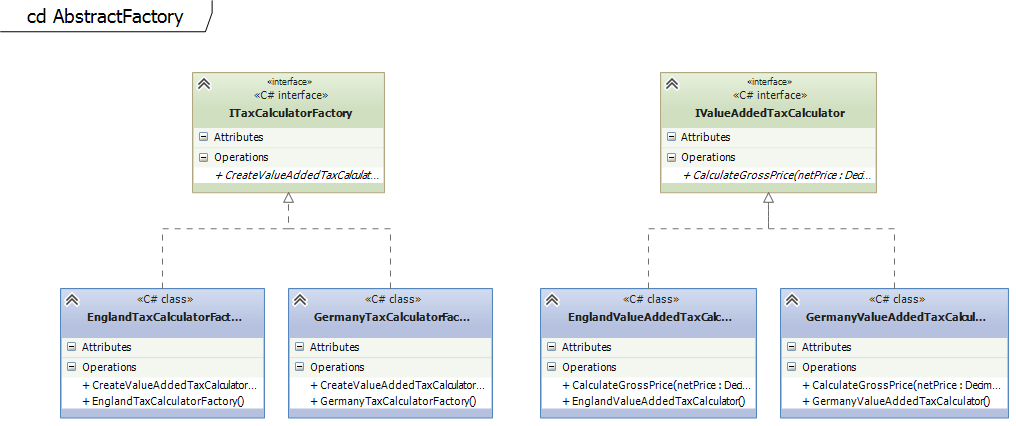
The abstract factory pattern is pretty similar to the factory method pattern. It is actually an object which implements multiple factory methods. Hence, it can be seen as a more flexible approach but introduces also more complexity.

Example on github

In this example the ITaxCalculatorFactory is implemented by different classes. Based on the location of the customer the right TaxCalculatorFactory is chosen (Germany or England in this example). The ITaxCalculatorFactory consists usually of multiple Factory Methods to get the right implementation for each use-case.

Trade-offs
The Abstract Factory cannot be easily extended to support multiple Factory Methods. Adding a new Factory Methods means changing the interface of the Abstract Factory and violates the Open-Close principle.

Builder Pattern

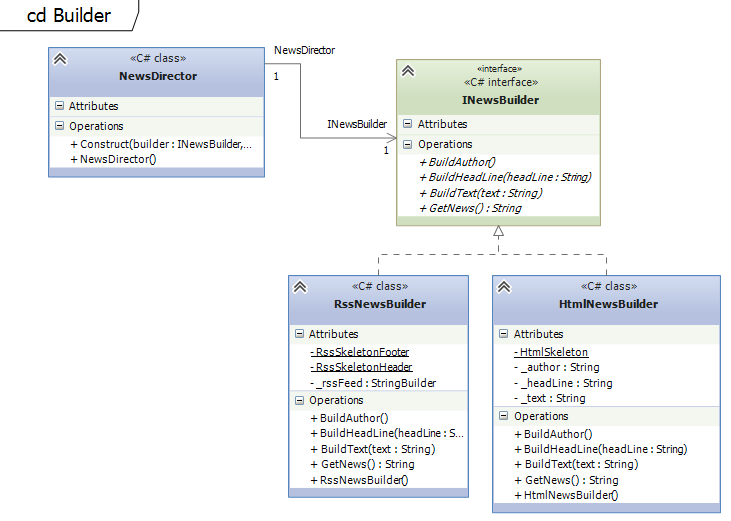
The most famous implementation of the Builder Pattern is the StringBuilder in .NET and Java. It allows splitting the creation of an object into multiple steps.

Example on github

In this example the creation of a news article is split into multiple methods, BuildAuthor, BuildHeadLine and BuildText.

Trade-offs
The Builder should not be used for objects with just a few fields.

Prototype Pattern

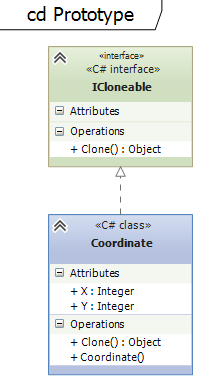
The prototype pattern is used to create a new object based on an existing one. Usually it is used to clone objects.

Example on github

This is the classical example which shows how the Prototype Pattern is implemented to clone objects.

Trade-offs
Each class has to implement its own clone method and therefore has to be adapted internally in order to support the prototype pattern. This can be difficult if external libraries are used.

Singleton Pattern

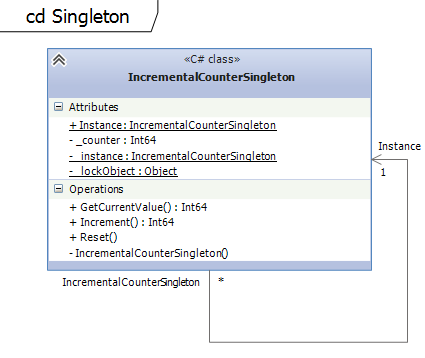
The singleton is one of the most used design patterns. It allows to create only one instance of a class. Singletons are usually used to coordinate operations in applications.

Example on github

The example shows how to implement a counter using the Singleton pattern. There exists only one instance of the IncrementalCounterSingleton which holds the current count. Double-Checked Locking Pattern is used to avoid multiple initialization and thread-safety.

Trade-offs
Singletons are very difficult to implement in multi-threaded/multi-process environments.
Singletons usually turn out to be the bottleneck of implementations because they usually need synchronization which slows down the system.

Behavioral Patterns


Visitor Pattern

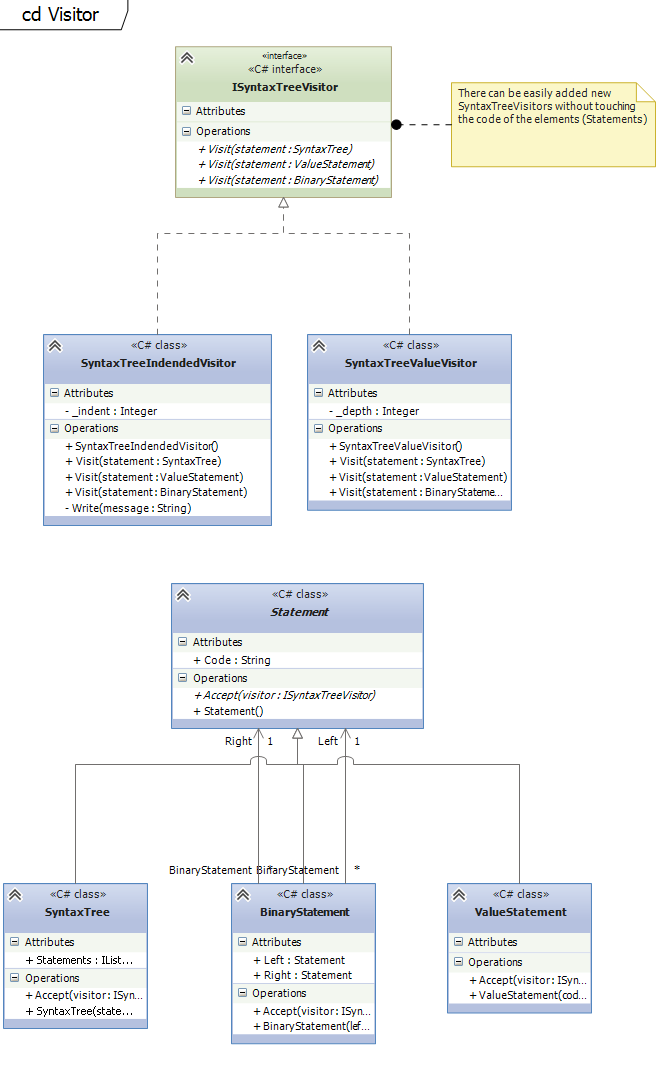
The visitor pattern allows defining new operation on classes without actually changing the class itself. It is possible to maintain a state between the visits of different classes which is especially in the compiler construction important.

Example on github

The classical examples for Visitors are SyntaxTrees which are used in the compiler construction. The structure of languages (classes for statements, etc...) is changed much rarely than new algorithms (operations on classes) are added, changed or removed to analyze the source code.

Trade-offs
If the visited data structures (classes) change frequently the visitor pattern is not a good fit. The visitor interface has to be changed anytime a new class is added or an existing one is removed.
The declaration of the visit methods is static and has to be defined in advance.

Command Pattern

The command is an object which contains all the necessary information to execute an action at a later point of time.
The command pattern is used in command query responsibility segregation (CQRS) architectures where the actions (commands) are separated from the queries. Command pattern is used to implement Redo/Undo operations.

Example on github
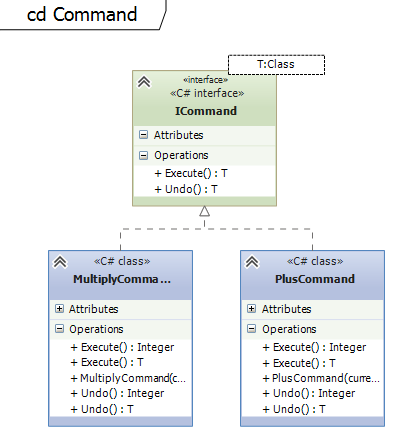
The example on github shows how a calculator with undo functionality can be implemented using the Command pattern. The unit test class CommandTest shows how a stack can be used to keep a undo history.

Trade-offs
Sometimes it is very difficult to store all the information needed to execute a command.
Additionally, CQRS architectures result usually in code with many small command classes.

Strategy Pattern

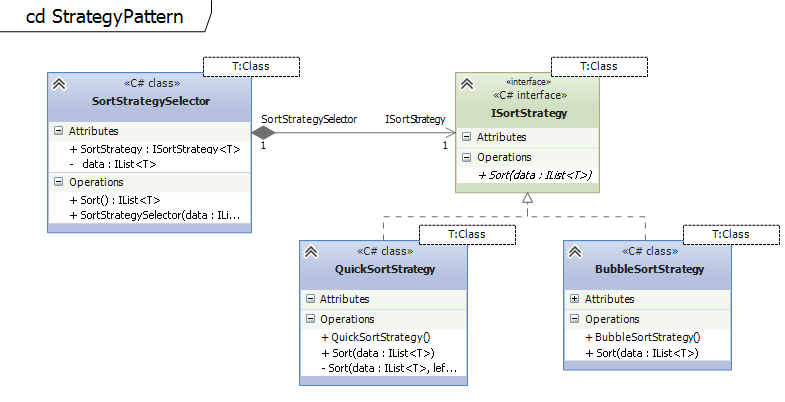
This pattern allows selecting the algorithm during runtime. It makes it possible to exchange algorithms easily.

Example on github

The example shows how the strategy pattern can be used to decide at runtime which sorting algorithm to use. There are two sorting strategies implemented: Bubblesort and Quicksort. One of these two algorithms is selected based on the number of elements which are passed to the Sort Selector class.

Trade-offs
The strategy selector must have all the data which is needed for all supported strategies. If the input data varies for each strategy, the selector class gets quite complicated.

System Center Orchestration Manager

This is the sixth of a series of blog posts around Cloud Computing. It gives an overview about the current Cloud Computing trends and explains how to set up a private cloud environment with Microsoft's System Center products.

This post is about the System Center Orchestrator (SCORCH), its features, capabilities and especially integration points.

The SC Orchestrator is the main workflow engine used to automate the processes in the private cloud.
It consists of two main components:
- Runbook Designer
- Orchestration Console

Runbook Designer
The Runbook Designer is the User Interface for creating workflows. On the right-side toolbar the available activities are shown. After installing the integration packs for the other System Center products, like SCVMM, some additional folders with activities should appear. There are plenty integration packs available to integrate almost all applications into the Orchestrator workflows.


The figure shows a simple workflow, called "CreateVM", which takes several input parameters (defined in the "InitializeData" activity) and connects to the SCVMM server to set up a new virtual machine ("Create VM from Template" activity). The InitializeData activity expects certain information like memory size, CPU count or machine name. This data is bound to the proper fields of the Create VM activity. (see screenshot)
After creating and checking-in the workflow, it can be executed using the Orchestration Console or Orchestration Web Service. Start activities provide a way to automatically trigger the workflow. The "Monitor File" or "Check Schedule" activities are waiting for specific events to kick-off the workflow, like a certain file is created or date is reached.

Orchestration Console
The Orchestration Console is a simple web application which allows to monitor or restart workflows.


Integration Layer - Orchestrator Web Service
There are two main integration points for the Orchestrator. On the one hand it is possible to use start activities which, for instance, monitor file changes or follow a certain schedule, on the other hand the Orchestrator Web Service can be invoked to start workflows or read their meta data.

The following web service query displays the details of the runbook with the name "CreateVM".

http://winscorch.tstune.de:81/Orchestrator2012/Orchestrator.svc/Runbooks?$filter=Name eq 'CreateVM'


Runbooks
http://winscorch.tstune.de:81/Orchestrator2012/Orchestrator.svc/Runbooks
2013-10-01T01:38:41Z


http://winscorch.tstune.de:81/Orchestrator2012/Orchestrator.svc/Runbooks(guid'4ceb5c4f-5ac1-4da1-9f3c-1d66f6280954')
CreateVM
2013-06-03T20:19:26+02:00
2013-10-01T01:18:43+02:00


    4ceb5c4f-5ac1-4da1-9f3c-1d66f6280954
    608bf0a8-3071-4c3d-8f6e-617286125b13
    CreateVM
    
    
    2013-06-03T20:19:26.403
    S-1-5-21-1169629555-895120178-2173626574-1106
    2013-10-01T01:18:43
    false
    \Thomas\CreateVM


This query selects a specific runbook and shows its input parameters. In this case the CreateVM runbook has a parameter CPUs of type integer.

http://winscorch.tstune.de:81/Orchestrator2012/Orchestrator.svc/Runbooks(guid'4ceb5c4f-5ac1-4da1-9f3c-1d66f6280954')/Parameters


Parameters
http://winscorch.tstune.de:81/Orchestrator2012/Orchestrator.svc/Runbooks(guid'4ceb5c4f-5ac1-4da1-9f3c-1d66f6280954')/Parameters
2013-10-01T01:41:07Z


    http://winscorch.tstune.de:81/Orchestrator2012/Orchestrator.svc/RunbookParameters(guid'af7e8e2e-84e7-46df-a565-0209eb618294')
    CPUs
    2013-10-01T01:41:07Z


        af7e8e2e-84e7-46df-a565-0209eb618294
        4ceb5c4f-5ac1-4da1-9f3c-1d66f6280954
        CPUs
        Integer
        
        In


...


This example shows how to integrate the Orchestrator Data Service into a C# .NET Console Application to figure out the input parameters of the "CreateVM" workflow.

First of all, a proxy has to be generated. Therefore, the Visual Studio Add Service Reference Wizard can be used like in the following figure.


This code creates an instance of the Orchestrator Data Service proxy class and provides the URL to the service.
It retrieves the runbook with the name "CreateVM" using a simple LINQ on the context. The context translates this query into the proper OData url (like the one above) and deserializes the result into the proxy types.

class Program
    {
        private static Uri orchestratorUri = new Uri("http://winscorch.tstune.de:81/Orchestrator2012/Orchestrator.svc");

        static void Main(string[] args)
        {
            // Creates an instance of the Orchestrator Data Service Context
            var orchestratorContext = new OrchestratorContext(orchestratorUri);

            // Linq-Query via the OrchestratorContext to retrieve the Runbook with the name "CreateVM"
            // Expand("Parameters") prefills also the subproperty Parameters
            var createVMRunbook = (from runbook in orchestratorContext.Runbooks.Expand("Parameters")
                                   where runbook.Name == "CreateVM"
                                   select runbook).FirstOrDefault();

            if (createVMRunbook != null)
            {
                Console.WriteLine("Runbook: {0}", createVMRunbook.Name);

                // Displays the parameters on the console
                foreach (var parameter in createVMRunbook.Parameters)
                {
                    Console.WriteLine("Parameter {0}, Type {1}", parameter.Name, parameter.Type);
                }
            }

            Console.ReadLine();
        }
    }

Finally, all the input parameters of the runbook are printed on the console like this screenshot shows:


This example shows how to leverage the Orchestrator Data Service to retrieve information about the available orchestrator runbooks. The example reads the input parameters from a specific runbook. The code could be used to build a dynamic user interface which provides input fields based on the workflow parameters.

This example shows the integration points of the System Center Orchestration Manager. With these integration points the Orchestrator can be easily connected to any ticketing system and can be used to automate your IT workflows. These workflows could cover any operations like creating a domain user, creating backups, migrating SQL server databases or setting up virtual machines in a private cloud.

10/01/2013

System Center Virtual Machine Manager

This is the fifth of a series of blog posts around Cloud Computing. It gives an overview about the current Cloud Computing trends and explains how to set up a private cloud environment with Microsoft's System Center products.

This post is about the System Center Virtual Machine Manager (SCVMM), its features, capabilities and especially integration points.

The SCVMM is the core of Microsofts System Center Suite. It provides a user interface for managing the private cloud environment. The SCVMM supports three virtualization platforms: Hyper-V, VMWare ESX and Citrixs Xen.

The SCVMM consists of two main applications, the administration console for managing clouds and the self-service portal giving the end-user access to his cloud infrastructure.

Important note:
The self-service portal is really rudimentary. If you are familiar with Windows Azure and you know its self service capabilities you will be very disappointed. That is also something very important to consider when building up your own private cloud. The basic setup is done quickly but offering the cloud service to your customers and integrating it into your IT landscape takes time and definitely needs custom implementation effort.

The good part is that the SCVMM User Interface is build on a flexible PowerShell layer which can be used to integrate the cloud management into your existing IT landscape.

Integration Layer - PowerShell
The PowerShell modules can be used to execute every possible command in SCVMM. It can used to integrate and automate processes like creating a virtual machine, networks or services.

The following remote PowerShell script lists all cloud environments in the SCVMM. The Invoke-Command specifies the remote computer name and the script to execute on this computer remotely. The first line of the script itself enables remote execution of signed scripts. By default, the PowerShell session allows only interactive commands. After that, the PowerShell module for the SCVMM is imported which enables a variety of new cmdlets. The last line executes the SCVMM command.

Invoke-Command -ComputerName winscvmm.tstune.de -ScriptBlock {
  Set-ExecutionPolicy -ExecutionPolicy RemoteSigned -Force
  Import-Module "C:\Program Files\Microsoft System Center 2012\Virtual Machine Manager\bin\psModules\virtualmachinemanager\virtualmachinemanager.psd1"
  Get-SCCloud
}

The Get-SCCloud command prints a list of all available cloud environments. The following output shows the details of the two available cloud environments for Test and Production:

PSComputerName         : winscvmm.tstune.de
RunspaceId             : 8266ea35-c166-4bba-b169-f4d40c00ca99
PSShowComputerName     : True
Description            : Cloud Test Environment
Name                   : TestCloud
LastModifiedDate       : 10/1/2013 1:40:00 AM
HostGroup              : {All Hosts}
CloudCapacity          : 7883d7f8-6608-4820-8f67-154e655da029
ID                     : 7883d7f8-6608-4820-8f67-154e655da029
IsViewOnly             : False
ObjectType             : Cloud
MarkedForDeletion      : False
IsFullyCached          : True

PSComputerName         : winscvmm.tstune.de
RunspaceId             : 8266ea35-c166-4bba-b169-f4d40c00ca99
PSShowComputerName     : True
Description            : Cloud Production Environment
Name                   : ProductionCloud
LastModifiedDate       : 10/1/2013 1:40:28 AM
HostGroup              : {All Hosts}
CloudCapacity          : 165228e8-674b-4f3b-b51f-bd848e45ea6e
ID                     : 165228e8-674b-4f3b-b51f-bd848e45ea6e
IsViewOnly             : False
ObjectType             : Cloud
MarkedForDeletion      : False
IsFullyCached          : True

PS C:\Users\Thomas>

The PowerShell commandlets provide a great and easy way to integrate the System Center Virtual Machine Manager with its cloud-capabilities into your existing IT landscape. The following script shows how easy it is to automate the creation of a virtual machine. This script could be easily used to integrate the SCVMM into existing ticketing systems which would reduce the overhead for setting up VMs manually:

$vmTemplateName = "Win2008R2_Template"
$cloudName = "TestCloud"
$vmName = "NewVM"
$memory = 1024
$cpus = 1

$cloud = Get-SCCloud -Name $cloudName
$vmTemplate = Get-SCVMTemplate -Name $vmTemplateName
$vmConfiguration = New-SCVMConfiguration -VMTemplate $vmTemplate -Name $vmName

New-SCVirtualMachine -Name $vmName -VMConfiguration $vmConfiguration -Cloud $cloud -Computername $vmName -CPUCount $cpus -MemoryMB $memory

This script takes a predefined template, called "Win2008R2_Template", and uses it to create a virtual machine configuration. This configuration is used together with a vm name, modified memory size and CPU count as a basis to set up a new VM.

Microsoft's Cloud Solution

This is the forth of a series of blog posts around Cloud Computing. It gives an overview about the current Cloud Computing trends and explains how to set up a private cloud environment with Microsoft's System Center products.

In this post the solutions around cloud computing from Microsoft are briefly highlighted.

Microsoft offers two different types of Cloud Solutions:
  • Windows Azure for Public Cloud (http://www.windowsazure.com)
  • System Center Suite for Private Clouds (http://www.microsoft.com/systemcenter)

Windows Azure

Azure is Microsoft's Public Cloud solution. It has been launched in February 2010 providing Platform-as-a-Service capabilities. It is supporting the main technologies like .NET, PHP, Java, Node.js, etc... but with a strong focus on ASP .NET web applications.

Microsoft provides automated rolling deployments and takes care about your complete patch management. In order to allow Microsoft installing latest patches on operating system and application server level, the application has to be set-up in an completely automated way using Batch or PowerShell start-up scripts. This allows Microsoft to shut down your application at any time and bring it back into a consistent state by re-executing your start-up scripts. Besides this "restriction" there is basically a complete Windows Server operating system available which you can adapt for your needs.

Recently, Microsoft has also introduced IaaS capabilities which allows you to simply provision virtual images. Microsoft extended their IaaS and PaaS platform to support non-Microsoft products as well: Linux, Hadoop, MySQL, PHP, Java, ...

System Center

Microsoft provides a set of tools, called "System Center", which can be used to build up a cloud environment in your own data center. Most of them are on the market for over a couple of years now. Microsoft has built connectors between these products to integrate them and enable automated interaction between these products in a Cloud environment. The following chapter gives a brief overview about the different parts before taking a look into the details of the main system center products. The following products can be used standalone as well as plugged together to leverage a private cloud.

System Center Virtual Machine Manager (SCVMM)

This is the core product for provisioning virtual images and creating private clouds. It provides an administration user interface as well as a self-service portal on top of your virtualization platform. Currently, it supports VMWare ESX, Citrix Xen Server and of course Hyper-V.

System Center Orchestrator

The orchestrator gives you a workflow engine to design and build automated processes. There are a lot of integration packs available for all kind of systems to integrate them within your custom workflows.

System Center Operation Manager (SCOM)

The operation manager is a monitoring solution. It allows you to monitor on operation system level as well as application level.
Besides the out-of-the-box support for standard software, there are also numerous management packs available to monitor certain systems.

System Center App Controller (SCAC)

The app controller allows you to move your applications seamless between different data centers or from private to Microsoft's public cloud Azure.

The system center suite consists of some more products which I do not list here because they are not playing an important role for setting up a private cloud.

1/03/2013

Manipulate WMI system details with WinDbg

While installing Microsoft's System Center Suite I ran into the problem that the installer did not proceed because the assigned memory size of my virtual machine was not enough. The VM was configured to make use of Hyper-V dynamic memory. Unfortunately I could not assign the necessary static amount of memory because my whole physical memory has already been assigned to other virtual machines which I could not turn off.


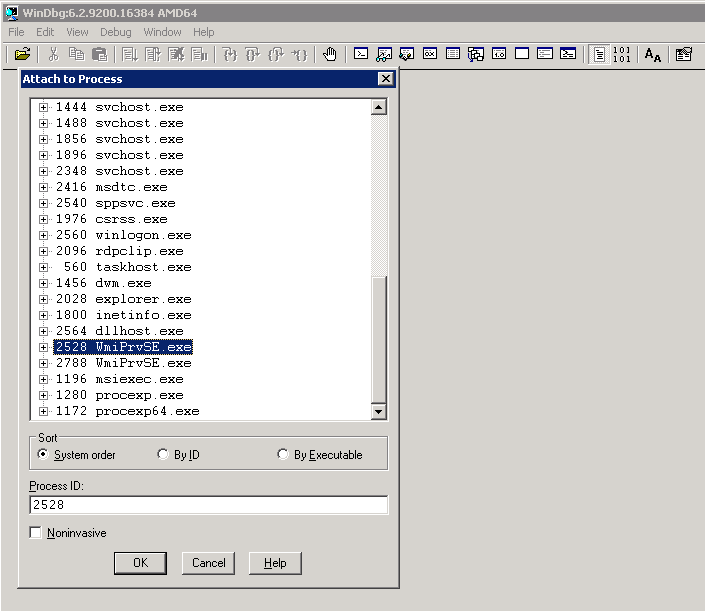
Therefore, I decided to use WinDbg to attach to the Windows Management Instrumentation process "Wmiprvse.exe" and change the result for the query of the memory size.

There are different possibilities to attach to a process in WinDbg which are described here. In my case the process was already running and I have been simply attaching in WinDbg. I had to attach to the process which was running under the NT AUTHORITY\NETWORK SERVICE account because my installer was executed on another machine and asked remotely the WMI interface for the memory size. If you want to attach to the process automatically when it starts up, you have to use the Remote Debugging techniques of WinDbg with NTSD which are described here. Network services are not allowed to interact with the desktop, therefore using gflags or the registry to automatically launch windbg would not work because the Window of WinDbg would never pop up.


After you attached to the "Wmiprvse.exe" process, you have to make sure that the symbols for the Microsoft libraries are available. Simply enter the following command in WinDbg to load the symbols on demand from the Microsoft Symbol Server.

.sympath SRV*C:\Symbols*http://msdl.microsoft.com/download/symbols

After that we can set a breakpoint for the GlobalMemoryStatusEx method which will be eventually called by the Wmiprvse.exe process to retrieve the memory size.

bp kernel32!GlobalMemoryStatusEx

Now you can simply resume the process with the g-command. The process is running now with the debugger attached with the breakpoint at the GlobalMemoryStatusEx method.

g

At this point of time the installer can be triggered to query for the memory size of the machine. After that you should immediately see in the WinDbg window the following output:

Breakpoint 0 hit
kernel32!GlobalMemoryStatusEx:
00000000`76f38928 ff2522500900    jmp     qword ptr [kernel32!_imp_GlobalMemoryStatusEx (00000000`76fcd950)] ds:00000000`76fcd950={KERNELBASE!GlobalMemoryStatusEx (000007fe`fd845c90)}

The breakpoint has been hit and now I have been stepping through the assembler commands of the GlobalMemoryStatusEx methods with the WinDbg p-command. Here you see the step-by-step debugging output:

0:006> p
KERNELBASE!GlobalMemoryStatusEx:
000007fe`fd845c90 4881ece8000000  sub     rsp,0E8h
0:006> p
KERNELBASE!GlobalMemoryStatusEx+0x7:
000007fe`fd845c97 833940          cmp     dword ptr [rcx],40h ds:00000000`0130d3d0=40000000
0:006> p
KERNELBASE!GlobalMemoryStatusEx+0xa:
000007fe`fd845c9a 0f8590090200    jne     KERNELBASE!TlsGetValue+0x11c0 (000007fe`fd866630) [br=0]
0:006> p
KERNELBASE!GlobalMemoryStatusEx+0x10:
000007fe`fd845ca0 4533c9          xor     r9d,r9d
0:006> p
KERNELBASE!GlobalMemoryStatusEx+0x13:
000007fe`fd845ca3 48899c24f0000000 mov     qword ptr [rsp+0F0h],rbx ss:00000000`0130d2b0={cimwin32!MyCWin32ComputerSystemSet (000007fe`f52a0ea0)}

...

0:006> p
KERNELBASE!GlobalMemoryStatusEx+0x16e:
000007fe`fd845dfe 48894b28        mov     qword ptr [rbx+28h],rcx ds:00000000`0130d3f8=0000000000000000
0:006> p
KERNELBASE!GlobalMemoryStatusEx+0x172:
000007fe`fd845e02 482b8c2488000000 sub     rcx,qword ptr [rsp+88h] ss:00000000`0130d248=00e08d0200000000
0:006> p
KERNELBASE!GlobalMemoryStatusEx+0x17a:
000007fe`fd845e0a 48894b30        mov     qword ptr [rbx+30h],rcx ds:00000000`0130d400=0000000000000000
0:006> p
KERNELBASE!GlobalMemoryStatusEx+0x17e:
000007fe`fd845e0e 488bbc24e0000000 mov     rdi,qword ptr [rsp+0E0h] ss:00000000`0130d2a0=f01b150000000000
0:006> p
KERNELBASE!GlobalMemoryStatusEx+0x186:
000007fe`fd845e16 488b9c24f0000000 mov     rbx,qword ptr [rsp+0F0h] ss:00000000`0130d2b0=d08e150000000000
0:006> p
KERNELBASE!GlobalMemoryStatusEx+0x18e:
000007fe`fd845e1e 4881c4e8000000  add     rsp,0E8h
0:006> p
KERNELBASE!GlobalMemoryStatusEx+0x195:
000007fe`fd845e25 c3              ret
0:006> p
cimwin32!CWin32ComputerSystem::GetCompSysInfo+0x32a:
000007fe`f50d677a 413bc4          cmp     eax,r12d
0:006> p
cimwin32!CWin32ComputerSystem::GetCompSysInfo+0x32d:
000007fe`f50d677d 7418            je      cimwin32!CWin32ComputerSystem::GetCompSysInfo+0x347 (000007fe`f50d6797) [br=0]
0:006> p
cimwin32!CWin32ComputerSystem::GetCompSysInfo+0x32f:
000007fe`f50d677f 4c8b842428010000 mov     r8,qword ptr [rsp+128h] ss:00000000`0130d3d8=00e0385400000000
0:006> p

I have been stepping through the GlobalMemoryStatusEx till the return (ret) command. After that I saw that the memory size has been stored in the register r8 (see line "mov r8,qword ptr [rsp+128h]") and I dumped the value of the registers by simply typing r in the WinDbg command window:

0:006> r
rax=0000000000000001 rbx=0000000000158ed0 rcx=000007fffd702000
rdx=00000000966e9000 rsi=0000000000151bf0 rdi=0000000000151bf0
rip=000007fef50d6787 rsp=000000000130d2b0 rbp=000007fef52a0ea0
 r8=000000005438e000  r9=fffffffffffffceb r10=0000000000000000
r11=0000000000000286 r12=0000000000000000 r13=0000000000000001
r14=0000000000000003 r15=ffffffffffffffff
iopl=0         nv up ei pl nz na pe nc
cs=0033  ss=002b  ds=002b  es=002b  fs=0053  gs=002b             efl=00000202
cimwin32!CWin32ComputerSystem::GetCompSysInfo+0x337:
000007fe`f50d6787 488d15ba5b1400  lea     rdx,[cimwin32!`string' (000007fe`f521c348)]

Here we can see that the register r8 contains the value of the memory size 0x000000005438e000 = 1413013504 (decimal) = 1347 MB

At this moment there have been 1347 MB of memory assigned to my virtual machine. But unfortunately the installer asked for 2 GB. Therefore I simply changed the value of the register r8 to 0x0000000080000000 = 2147483648 (decimal) = 2048 MB

r @r8=80000000


Finally, I resumed the process and voila the installer proceeded.